Reception LED Display: Installation, Configuration, and More!
Are first impressions important? There is no doubt about it. How to make your reception leave a deep impression on your customers or visiting business partners? The reception LED display screen helps you establish a good corporate image!
This article provides you with a comprehensive introduction to reception LED screens, including their functions, installation tutorials, screen configuration, and other content.
Click Here to Jump!
1. What is a Reception LED Display Screen?
2. 6 Steps to Install Reception LED Display
3. How to Configure Reception LED Screen?
4. What Can LED Signage Do for Your Reception Area?
5. 3 Tips to Use Reception LED Digital Screen
1. What is a Reception LED Display Screen?
Reception LED video wall, or reception LED display screen is an LED display device installed in the company lobby or the reception area of a hotel or government agency.
The reception desk is the first display window for corporate images. If you run a customer-facing business, you know this firsthand.
The high-end, clean, and elegant high-quality LED display screen helps to enhance the image and attractiveness of the reception area.
Next, we will show you how to install and configure an LED screen for the reception area through a real customer case.
The following types of LED displays are usually installed at the company’s front desk:
(1) Monochrome LED display
Mainly used to display simple information, such as company name, welcome words, time, etc. Monochrome screens are low-cost and easy to install.
(2) Two-color LED display
Compared with monochrome screens, two-color screens can display richer information, usually red and green, suitable for occasions where certain information needs to be highlighted.
(3) Full-color LED display
Can display full-color images and videos, suitable for company front desks that require high-quality visual displays.
This display can better display the corporate image and convey richer information.
(4) Transparent LED display
This display has high transparency and will not block the background too much.
It is suitable for installation on glass curtain walls or windows to increase the transparency of the space.
(5) Curved LED display
If the front desk design is more special, you may need to customize the curved LED display to meet specific design requirements.
(6) Digital Signage
This type of display usually integrates multimedia playback functions and can display dynamic images, videos, scrolling text, etc.
It is very suitable for front desk information display and brand promotion.
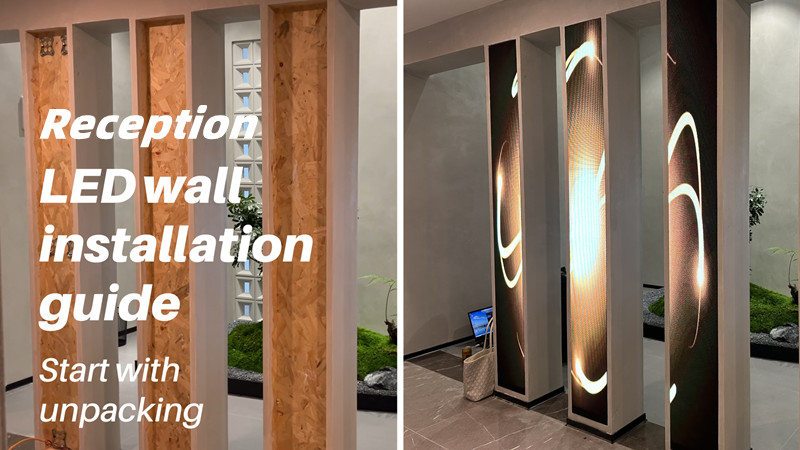
2. 6 Steps to Install Reception LED Display
From unpacking, and installing the LED screen to debugging the LED screen software, a comprehensive tutorial video is here!
Real Customer Case-ME250 Series Reception LED Screen
Product Details:
- Product: ME250 Series(6 PCS)
- Cabinet Size: 250*1000mm
- Pixel Pitch: P2.604mm
- Screen size: 750*2000mm
- Location: Changsha, China
How to quickly install a reception LED video wall? Just need 6 steps!
(1) Positioning
(2) Use the connected pedal and fasten the screws
(3) Install LED cabinet
(4) Connect the cables
(5) Install LED modules
(6) Adjust the software
1) Preparations before installation
First, we need to dismantle the packaging of the box and accessories. Be careful to handle it with care to prevent the box from being bumped.
Arrange the cabinet, wires, connecting pieces, and other materials to facilitate subsequent installation work.
What we need:
LED cabinets, LED modules, connected pedals, screws, screws driver, power & network cables, USB disk
2) Positioning
First, place the box into the slot where it is to be installed, and determine the screw fixing position of the connecting piece according to the hole position of the box.
Then, use a red pen to mark the determined location.
3) Use the connected pedal and fasten the screws
According to the positioning points determined in the previous step, install the connected pedals and tighten the screws to secure the connecting piece.
Note that the screws must be tightened to ensure that the connecting piece is secure.
4) Install LED cabinet
Install reception LED screen cabinets.
First, close the quick lock to secure the cabinet.
Then tighten the screws to ensure that the cabinet and connecting piece are tightly connected.
Next, connect the main power cable.
5) Connect the cables
Connect the power cords between modules
This reception LED screen uses an asynchronous sending card to control the screen.
You can send programs to the sending card through network cable, 3G&4G, wifi, and USB flash drive. The program will be uploaded to the memory of the sending card.
These programs will then be transmitted to the receiving card. Even without computer control, the LED screen can still display program content normally.
Connect the network cables
After connecting the network cable, the indicator light of the NovaStar MRV412 receiving card will flash.
A green light indicates that the signal is working properly.
Finally, connect the yellow network cable to the receiving card.
6) Install LED modules
Connect the power cord and ribbon cable of the module and fix it on the LED screen cabinet.
ME250 series indoor LED display uses magnetic modules. Quick installation without the need for additional tools.
There are 10 powerful magnets on the back of each 250*250mm LED module to ensure that the module will not fall off.
7) Adjust the software
After the module is installed, the installation of the entire reception LED display screen is completed.
How to publish content? How can this screen display content correctly to enhance the image of the front desk?
Next, we need to debug the LED screen software.
https://youtu.be/pf7u9Y2RU28?si=wX6IpHvnOLhdrgEv
3. How to Configure Reception LED Screen?
Whether it is a synchronous control system or an asynchronous control system, configuration software is required to configure the control system.
Screen debugging also becomes an important step after installation.
We use NovaLCT, a configuration software, to control the LED display system.
Next, we will introduce to you what novaLCT is and how to use NovaLCT to debug LED displays.
3.1 What is NovaLCT?
NovaLCT is an LED display configuration software. It was developed by a world-renowned LED display system supplier for various display applications.
As a powerful display configuration tool, NovaLCT has the characteristics of a wide application range, rich functions, and efficient configuration.
With NovaLCT, you can quickly manage your LED screen and get better image quality.
3.2 How to Download NovaLCT?
Downloading NovaLCT is easy.
(1) Directly login to the software download page of the Novastar official website to download the latest version.(https://www.novastar.tech/downloads/)
Another way: Use the USB we prepared to directly decompress the NovaLCT software compressed package, and then proceed to the next step.
(2) Install on your computer
(3) When Windows Firewall notifies an alarm, allow access
3.3 Features of NovaLCT
(1) Easy to install
The latest software installation package can be downloaded from the Novastar official website at any time.
At the same time, you can also download or check other information. For example: Configuration Tool User Manual Synchronous, Configuration Tool User Manual Multimedia Player,
Test Tool User Manual, etc.
(2) Powerful function
Novastar NovaLCT supports multiple functions. Such as picture configuration, brightness adjustment, multi-function card management, and other configuration management.
After debugging the screen through NovaLCT, it is convenient to manage the screen and optimize the picture quality.
(3) Wide range of applications
Suitable for synchronous control and asynchronous control systems. It can meet a variety of needs and covers many users such as manufacturers, rentals, and technical engineers.
3.4 How to Configure Reception LED Screen With NovaLCT?
(1) Basic steps
Step 1: Open NovaLCT
Open the software on the USB flash drive and unzip it
Step 2: Connect the wifi of this LED product
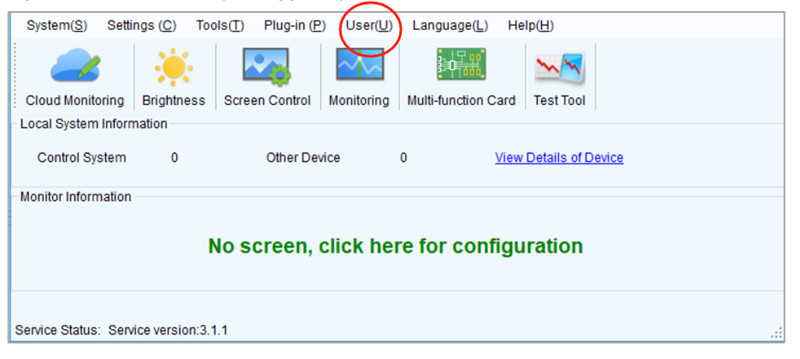
Step 3: On the menu bar, choose User > Media Player Login.
Click user-media player login-connect system
(User name: ADMIN password: SN2008@+)
(2) Configuration steps
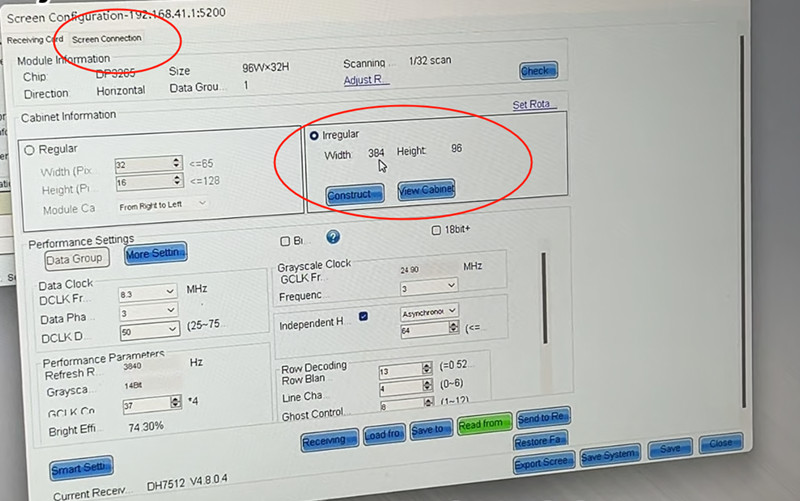
Step 4: Click Screen Configuration > Next
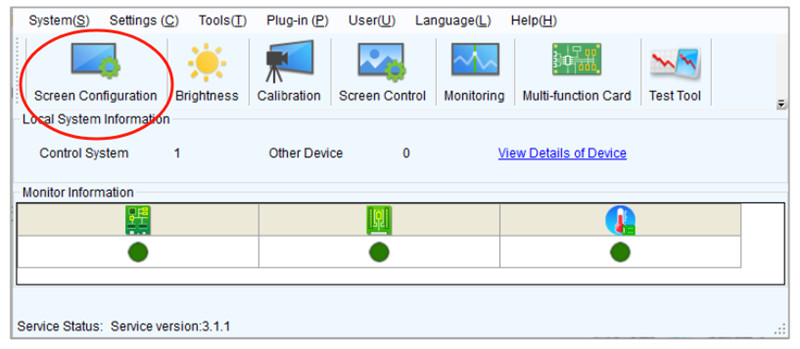
Click Read From, then we can see the pixel pitch here
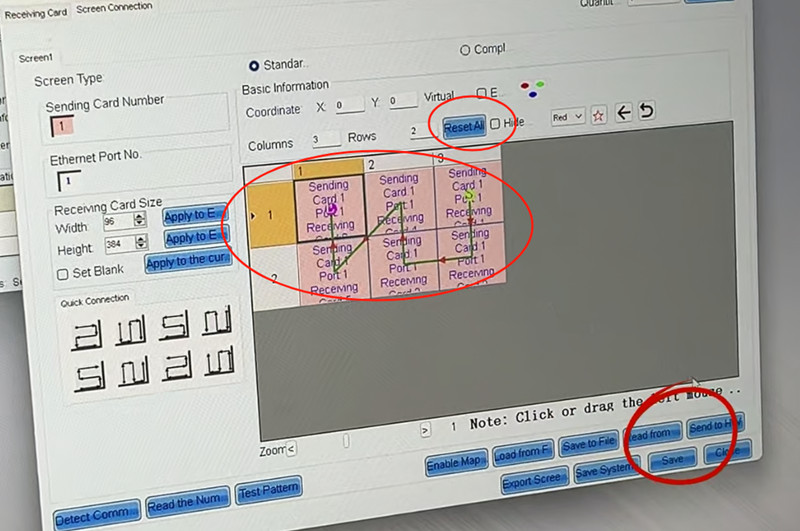
Then, turn to Screen Connection
Step 5: Click Reset > Click the screen accordingly > Click SEND and SAVE
Finally, the reception LED display screen configuration is finished!
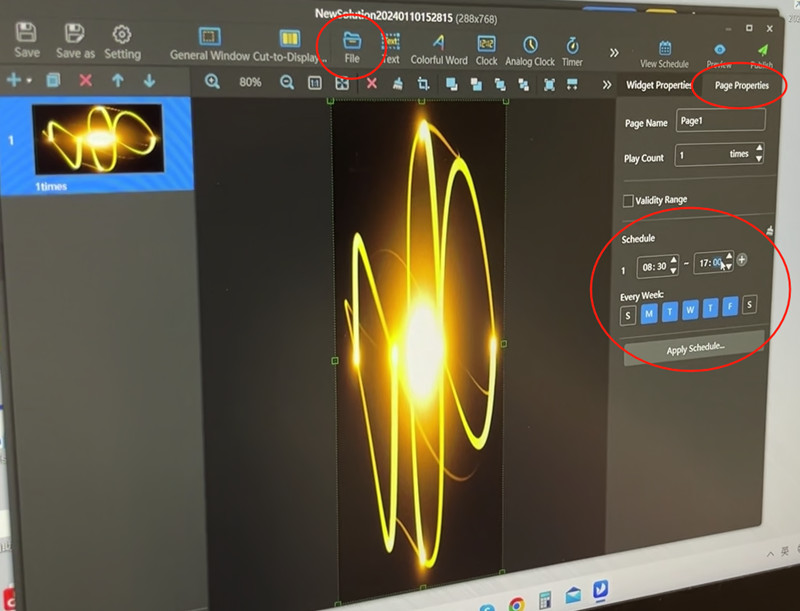
3.5 How to upload programs and control the playback time?
Here we will use another software: ViPlex Express
(Directly unzip the installation package in the USB flash drive to install)
Step 1: Open ViPlex Express
Step 2: Click File to upload program materials
Step 3: Click Page Properties to control video playback time
Step 4: After the settings are completed, click Publish
4. What Can LED Signage Do for Your Reception Area?
4.1 Corporate Image Display
High-quality LED display for reception area with high definition and strong color expression.
Companies or agencies can display the company’s logo, pictures, corporate videos, and other content to convey the brand image and enhance brand awareness.
4.2 Promotion and Advertising
The front desk usually receives many visitors. Display the company’s products, services, or special event advertisements through the reception LED display screen.
High brightness and bright colors can quickly attract customers’ attention, increase brand awareness, and increase sales opportunities.
For example, the advertising LED display at the front desk of a large office building often displays office rental or sale information in a loop.
4.3 Welcome and Guidance
Digital LED signage in the reception area can be used to welcome visitors and provide guidance information.
For example, when a superior leader comes to inspect, the large screen can scroll and play a welcoming poster or text message.
When there is an event or meeting, the reception LED display helps participants quickly find the venue by displaying event guidance information.
In general, LED signage screen at the reception desk helps improve reception efficiency and user experience.
4.4 Information Release
Indoor reception LED displays can be used to publish important information inside or outside the enterprise, such as meeting notices, announcements, news, etc.
This ensures that employees and visitors are informed of relevant information in a timely manner and improves communication efficiency.
5. 3 Tips to Use Reception LED Digital Screen
5.1 Ensure The Quality of Content
The front desk is the face of a company or brand. Therefore, it is recommended that the content you play should be carefully polished.
Dynamic and atmospheric videos, brightly colored pictures, and high-quality program sources impressed the visitors deeply.
It helps to enhance customers’ trust and goodwill towards the company.
5.2 Various Installation Forms
Why not try different reception LED video wall solutions?
You can install a large fixed LED video wall on the wall behind the reception desk. You can also install a screen at the reception desk.
According to your installation environment, we can design the most personalized reception LED screen solution for you.
5.3 Set The Playback Time Reasonably
Depending on your working hours and events or meetings, setting the screen playback time appropriately can save you a certain amount of electricity bills.
Playback time setting is easy via ViPlex Express.
6. Recommended Products
MA250 Series Indoor LED Display
250*1000mm Cabinet Standard Size
Support Split-screen Multi-module Display
Hard Connection & No Cables
Front or Rear Dual Maintenance
Aluminum Cabinet Frame
Click Here
MA640 Front Service LED Display
640*480mm Cabinet Standard Size
SMD 3 in 1 LED Encapsulation technology
Frontal Service Design
Magnesium Alloy Cabinet Design
CE, Rohs Approved
3-Year Warranty and 5% Spare Part
Click Here
Tips for Choosing Reception LED Display
When choosing an LED display, consider the following factors:
(1) Budget: Budget is an important factor in deciding which type of display to choose.
(2) Purpose: What content will the display be used to display, whether it is simple text information or complex videos and images.
(3) Space: The size and layout of the reception space will also affect the choice of display.
(4) Design style: The appearance and style of the display need to be coordinated with the company’s overall image and the design style of the reception.
Depending on the specific situation and needs, the company can choose the most suitable type of LED display.
7. The Bottom Line
In this post, we introduce you to the installation method of the digital reception LED display screen and screen debugging tutorial through a real case.
In short, a digital LED screen for the reception area helps enhance your corporate image and provide customers with a good reception experience.
UNIT LED has rich experience and the ability to provide you with high-quality reception LED display solutions. Just send a message to get a quote now!