LED Wall Photography: How to Remove Stroboscopic & Moiré?
Two of the most frustrating issues in LED wall photography are the stroboscopic effect (flickering or banding) and the moiré effect (strange wave-like or mesh patterns on the screen). These problems are not defects in the wall or the camera. They result from a mismatch between display technology and camera optics or settings.
As LED walls become increasingly common in virtual production, concerts, live broadcasts, and commercial shoots, they’ve revolutionized visual storytelling. With their vivid brightness, flexible sizing, and dynamic content capabilities, LED video walls are now replacing traditional green screens and static backdrops.
Suppose you’re struggling to understand how to remove the stroboscopic or moiré pattern in LED screen photography. In that case, this guide will walk you through the science and practical solutions behind both issues.
Whether you’re working with LED walls for XR stages, product ads, or content creation, resolving these visual distortions is essential for achieving professional results.
Table of Contents
1. Stroboscopic Effect in LED Wall Photography
1.1 What Is the Stroboscopic Effect?
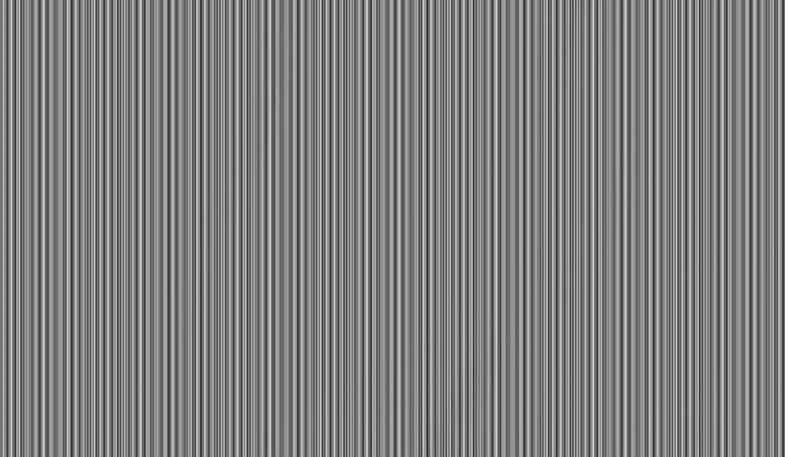
The stroboscopic effect—also referred to as LED flicker on camera—manifests as horizontal bands, stripes, or flickering across your video footage.
It’s caused by the interaction between the LED display refresh rate and the shutter speed or frame rate of your camera.
Features that are different from moiré patterns:
A. Stripe morphology: linear regular arrangement, unidirectional uniform motion
B. Dynamic characteristics: synchronized scrolling with screen refresh
C. Trigger condition: camera shutter parameters and display refresh rate mismatch
Stroboscopic Effect In LED Wall Photography
Unlike traditional LCDs, LED walls don’t emit constant light. They refresh row by row at a high frequency—usually invisible to the human eye. But if your camera captures frames at a rate that falls out of sync with that refresh cycle, it records inconsistencies in brightness from one frame to the next.
This results in visible strobing or banding in playback.
1.2 Why Does It Happen?
(1) Low LED Refresh Rate
LED display screens with low refresh rate (e.g., <1920Hz) appear fine to the eye but flicker under high-speed cameras.
(2) Improper Camera Settings
A fast shutter speed or an unmatched frame rate fails to “blend” the flicker.
(3) Lack of Synchronization
No genlock or timing coordination between the camera and LED video wall.
This is especially problematic when shooting at high frame rates (e.g., 120fps or 240fps for slow motion). Even high-quality LED panels may flicker unless properly synchronized.
1.3 Where It Commonly Appears
– LED backdrop interviews
– Commercial shoots with product demos on digital screens
– Concert visuals and event recordings
If you’re shooting with a RED, ARRI, Sony FX, or even DSLR cameras, encountering this issue without awareness or preparation can lead to unusable footage.
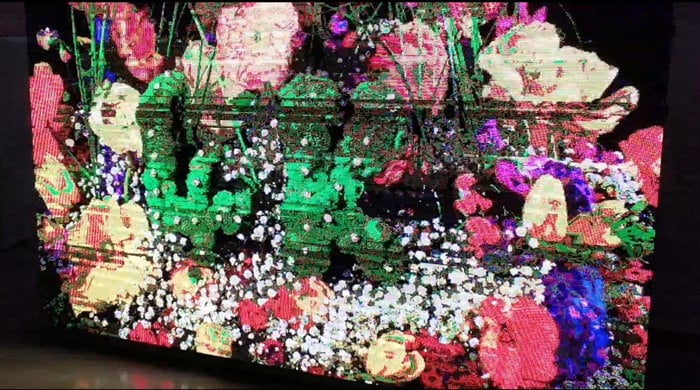
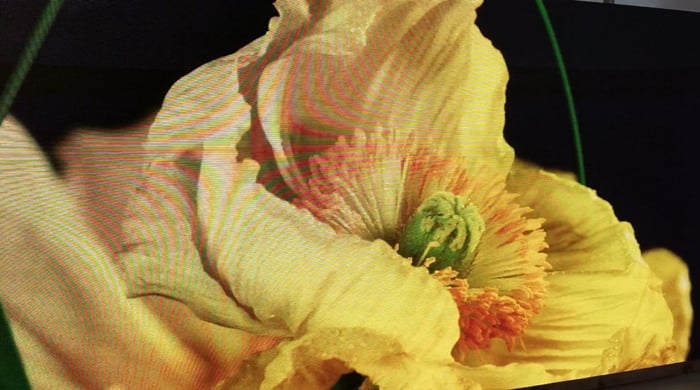
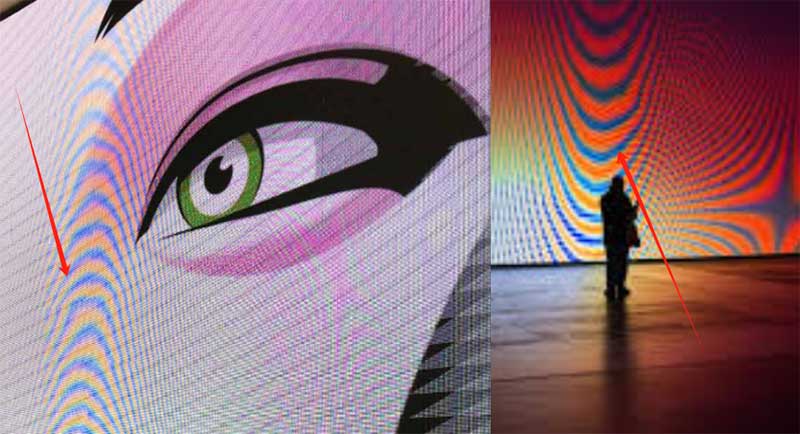
2. Moiré Effect in LED Shoots
The moiré effect in LED wall photography occurs when the grid-like pixel structure of the LED panel interferes with the camera sensor’s own pixel grid. This interference creates wavy patterns, ripples, or moving meshes that aren’t visible to the naked eye.
It’s a digital optical illusion—but one that can’t be ignored in professional-grade footage.
2.1 Scenarios That May Produce Moiré Effect
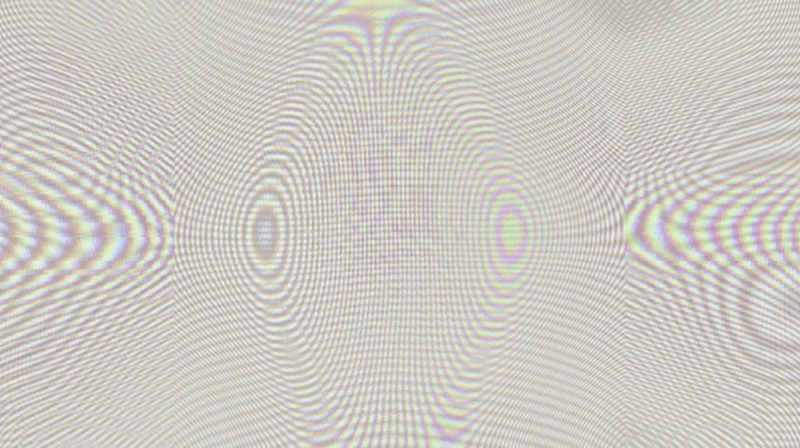
Moiré patterns are visual distortions that appear as wavy lines or ripples when two regular grids overlap.
On LED displays, moiré effects can distort images or text, affecting the viewer’s experience.
Understanding what causes these patterns is crucial for troubleshooting LED displays, particularly when working with high-resolution or creative LED screens.
Below are the key reasons moiré patterns may appear:
1) Light Reflections
External light sources (e.g., sunlight or ceiling lights) reflecting off the screen surface can cause visual interference.
It is particularly noticeable on outdoor LED screens or in environments with complex lighting setups.
2) Inadequate Refresh Rate
Suppose the LED screen has a low refresh rate. In that case, it may not update quickly enough to match fast-changing visuals, causing flicker and moiré effects.
Especially during video playback or real-time rendering, like gaming or dynamic presentations.
3) Pixel Misalignment
When pixels are not precisely aligned, either due to poor manufacturing, incorrect installation, or configuration errors.
This misalignment can create interference patterns, resulting in visible distortions on the LED video wall.
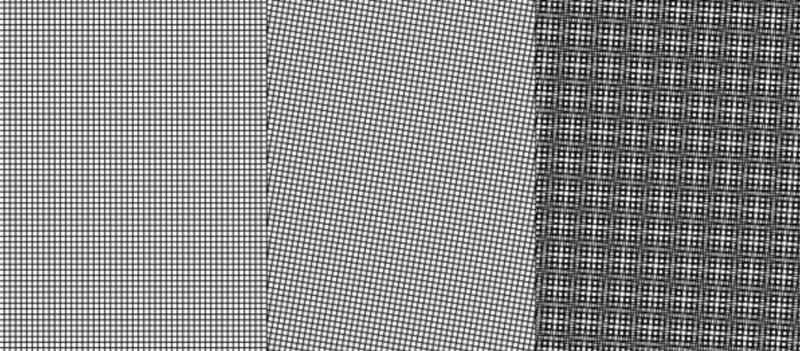
4) Complex Designs and Repetitive Patterns
Fine geometric designs or repeated patterns are highly susceptible to moiré effects, especially when scaled improperly or displayed on low-resolution LED modules.
This issue is more prominent on creative LED displays with unique shapes or layouts.
5) Software or Driver Incompatibility
Incompatible software or outdated graphics drivers can mishandle image scaling or interpretation, especially when displaying detailed graphics.
This misinterpretation may lead to poor rendering and moiré effects, particularly on high-resolution LED displays.
6) Low-Quality Video Cables
Using low-grade HDMI or signal transmission cables can cause signal degradation.
This weak signal may distort the image quality, leading to pixelation and the appearance of moiré patterns on your LED panel.
7) Overlapping Visual Elements
When two UI layers, images, or video elements overlap on the screen (e.g., text over graphics, pop-up windows over a background).
It can create conflicting pixel grids that produce moiré artifacts on the digital LED screen.
8) Poor Anti-Aliasing
Anti-aliasing helps smooth out jagged edges in digital content.
If the display or content rendering system applies low-quality anti-aliasing, high-frequency graphics (like parallel lines or diagonal strokes) may generate unwanted moiré effects on the LED screen.
9) Thin Strokes and Small Fonts
Detailed fonts or fine lines are hard to reproduce on lower pixel density screens. When such details blend or interfere with the LED pixel grid, moiré distortions may appear.
10) High-Contrast Images
Sharp transitions between black and white or dark and bright areas, such as checkerboard patterns, can cause visual interference.
It can lead to strong moiré effects, especially on displays with larger pixel spacing.
11) Low LED Display Resolution
A low-resolution LED screen has fewer pixels per inch, making it harder to reproduce fine details.
This can result in visible grid interference when displaying small fonts, fine lines, or detailed graphics, especially on indoor LED video walls with pixel pitches above P2.5.

12) Electromagnetic Interference
Nearby electronic devices—like mobile phones, routers, or microwaves—can emit electromagnetic waves.
Interfering with the LED signal will produce ripple effects or distortions on the screen.
13) Mismatched Pixel Densities
When an image with a different pixel density is displayed on a screen with fixed pixel spacing, misalignment occurs.
This mismatch between content and screen resolution often results in moiré effects, especially on large LED walls used in exhibitions or control rooms.
14) Viewing Distance
At certain viewing angles and distances, the human eye can perceive the interference patterns created between the content and the LED pixel structure.
Adjusting the viewing distance can sometimes reduce or eliminate moiré.
15) Physical Damage to the LED Screen
Scratches or cracks on the LED surface can scatter light and disrupt the pixel grid.
This irregularity may introduce moiré patterns or other visual noise, especially when displaying uniform content.
16) Incompatible Content
If the video or image resolution is not optimized for the LED screen’s native resolution, pixel mismatches will occur.
For example, upscaling a low-resolution video for a large LED video wall may amplify moiré patterns.
17) Poor Color Calibration
Incorrect color and brightness settings can exaggerate visual inconsistencies, making moiré effects more noticeable.
Especially when displaying high-saturation or diagonally patterned content.
18) Improper Scaling
If images or videos are scaled without maintaining aspect ratios or alignment, the pixel mapping may create mismatched visual grids, resulting in moiré effects.
So, always scale graphics according to the LED screen’s native resolution.
2.2 Why Moiré Is a Problem in LED Screen Filming
(1) Post-production can’t always fix it
While some moiré can be minimized using anti-aliasing filters or digital blur, the results are often imperfect.
(2) It reduces perceived quality
Viewers may think there’s something wrong with your screen or setup.
(3) It affects branding
Especially in commercial or corporate videos, moiré artifacts can distract from core visual messaging.
3. How to Reduce Stroboscopic in LED Wall Photography?
The stroboscopic effect is one of the most common technical challenges in LED wall photography. But it can often be avoided—or even eliminated—by taking the right steps during setup and shooting.
Here’s how to fix or reduce it effectively:
3.1 Adjust Camera Settings
Shutter speed plays a major role in flickering issues.
When the shutter speed clashes with the LED wall’s refresh cycle, the camera captures different brightness levels across frames. To fix this:
Match shutter speed to refresh rate. Use 1/50, 1/60, or 1/100 depending on your region’s power frequency and the LED screen’s specs.
Professional Advice:
- Get the precise refresh rate parameters of the display before shooting (it is recommended to provide SDI output signal)
- Use an oscilloscope to detect the actual refresh waveform
- High-end displays can be set to engineering mode to output standard video formats
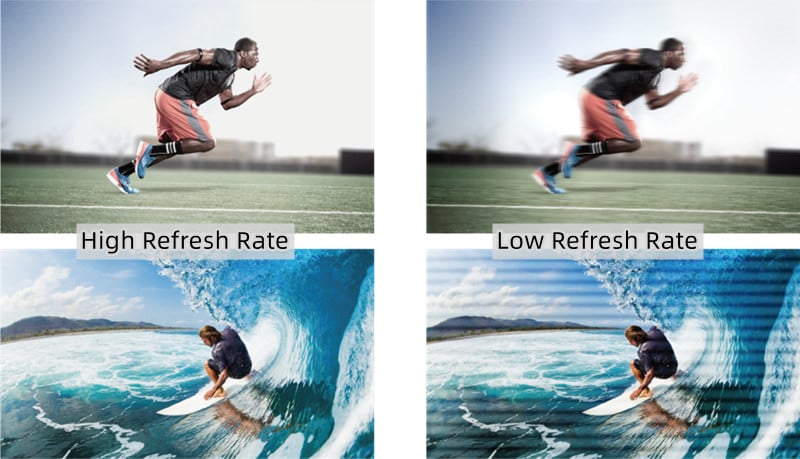
3.2 Use High-Refresh Rate LED Screens
The higher the refresh rate of the LED screen, the less likely you’ll encounter flickering.
Modern screens for filming use refresh rates of 3840Hz or higher, which are nearly invisible to the camera sensor.
- Choose ≥3840Hz screens
Ideal for cinema, XR production, or live broadcast.
- Look for PWM optimization
Pulse Width Modulation (PWM) can affect flicker—seek screens with constant current drive and flicker-free driver ICs.
- Professional-grade LED panels
Often marked as “camera-friendly” or “broadcast-ready.”
If you’re renting LED walls for a shoot, always confirm the refresh rate and PWM performance before setup.
https://youtu.be/L6fU2hreNZY
3.3 Synchronize Camera with LED Wall
For large-scale productions, especially those using LED volumes for virtual sets (e.g., XR, ICVFX), genlock synchronization ensures camera and LED wall timing are perfectly aligned.
- Use genlock or sync box
These devices lock the frame capture timing of the camera with the LED processor.
- LED controllers with sync input
Some professional video processors support camera genlock directly.
- Ideal for virtual production
Genlock is essential in Unreal Engine workflows or virtual production LED stages.
Synchronization removes nearly all stroboscopic issues and creates a seamless image pipeline.
3.4 Hardware Adaptation Solution
Recommended Global Shutter Devices:
Sony PXW-FX9 (Global Shutter Mode)
RED KOMODO-XARRI
ALEXA 35 Technical
Advantages: Eliminate timing differences in line scan imaging
3.5 Standard Conversion Solution
Key points of PAL/NTSC standard switching:
China’s radio and television standards adopt PAL-D (50Hz field frequency)
Multinational projects need to predict the compatibility of display system standards
It is recommended to equip a multi-standard signal converter
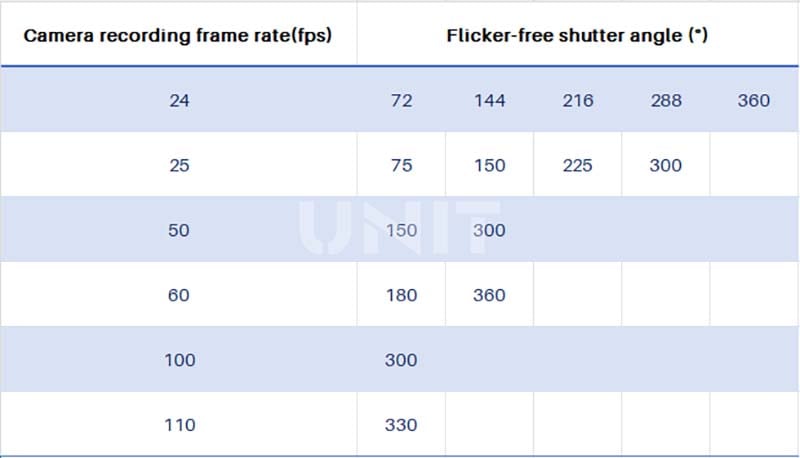
When the LED screen refresh rate is 120Hz, the camera’s available frame rate, that is, the camera frame rate corresponding to the flicker-free picture presented by the monitor is 24fps, 25fps, 50fps, 60fps, 100fps, 110fps
When the LED screen refresh rate is 60Hz, the camera’s available frame rate is 24fps, 25fps, 50fps, 60fps, which can support most film and television shooting needs
When the LED screen refresh rate is 120Hz, the Venice camera is upgraded to 110fps, and there is no flicker when the shutter angle is set to 330°
4. How to Remove Moiré Effect in LED Wall Photography?
While stroboscopic flicker is a timing issue, the moiré effect is an optical one.
It can’t be fixed in post—so prevention during shooting is critical.
Below are practical solutions to reduce or eliminate moiré patterns in LED screen photography.
4.1 Optical avoidance solution
(1) Spatial Parameter Optimization
The best shooting distance formula: d ≥ (p×N)/λ (p: pixel pitch; N: lens resolution; λ: correction factor)
It is recommended to use an off-axis shooting angle of 30°~45°
(2) Optical device configuration
Professional-level solution:
Install an anti-aliasing optical low-pass filter (OLPF)
Use an anamorphic widescreen lens system
Configure a variable electronic ND filter
4.2 Imaging System Optimization
(1) Sensor Selection Strategy
Advantages of full-frame CMOS:
Shallow depth of field blurs the background pixel structure; Recommended to use a telephoto lens of 85mm or more
Broadcast camera solution:
Sony HDC-4300 (2/3″ global shutter); Chishang HK-388 (4K HDR mode)
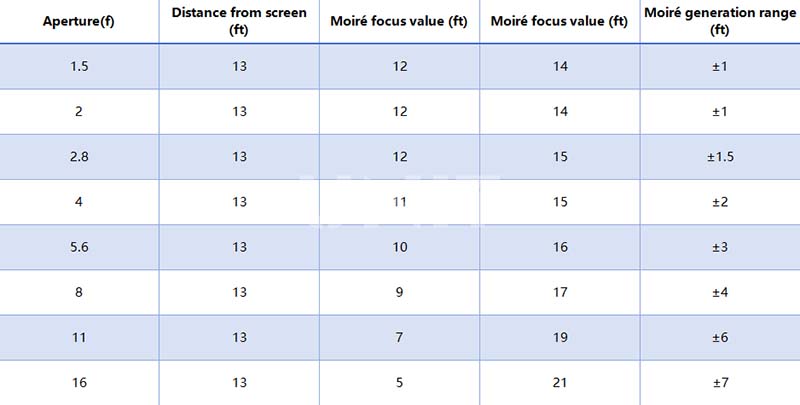
(2) Focus on Control Technology
Professional operation specifications:
Strictly manually focus on the subject; Keep the subject ≥3m away from the display; Use the peak focus assist function
4.3 On-site Emergency Response
(1) Optical Filter Solution
It is recommended to use professional anti-moire filters: Tiffen DFX-Moire, Schneider DigiCon
Emergency alternative: Use 200D nylon diffusion film, apply 0.5mm grid soft light sheet
(2) Display End Parameter Adjustment
Optimize display settings under permitted conditions:
Enable pixel shifting; Adjust the sub-pixel rendering algorithm; Activate dynamic scanning mode
4.4 Professional Technical Suggestions
(1) Preliminary Preparation
Obtain the display technical specification sheet (including refresh rate, pixel pitch, etc.)
A pre-shooting test should include full brightness step test
Establish a mapping table between camera parameters and display parameters
(2) On-site Execution Specifications
Dual-camera redundant shooting (different parameter combinations)
Use a waveform oscilloscope for real-time monitoring
Retain the RAW format original materials
This solution is based on GB/T 34968-2017 “Measurement Methods for Digital Display Devices” and the SMPTE ST 2084 standard is formulated for 4K/HDR production environment.
It is recommended that film and television production teams establish a collaborative working mechanism with LED display engineers to optimize the matching of optoelectronic parameters at a system level.
5. Tips for Shooting LED Displays in Different Scenarios
Understanding the theory behind LED wall photography is important. But insights from working professionals provide the most valuable guidance.
Here’s how experienced cinematographers and content creators approach common LED wall challenges on set.
5.1 Filming Live Performances and Concerts LED Screen
In music events and stage shows, LED walls are a visual centerpiece.
How to reduce flicker and moiré effect:
Use broadcast-ready LED walls. Ensure the refresh rate is ≥3840Hz.
Position the camera at off-angles. Slight tilts reduce grid alignment.
Set shutter to 1/60 or 1/100. Matches the LED panel’s timing and avoids flicker.
Coordinate with the LED tech team. They can adjust brightness and PWM if needed.

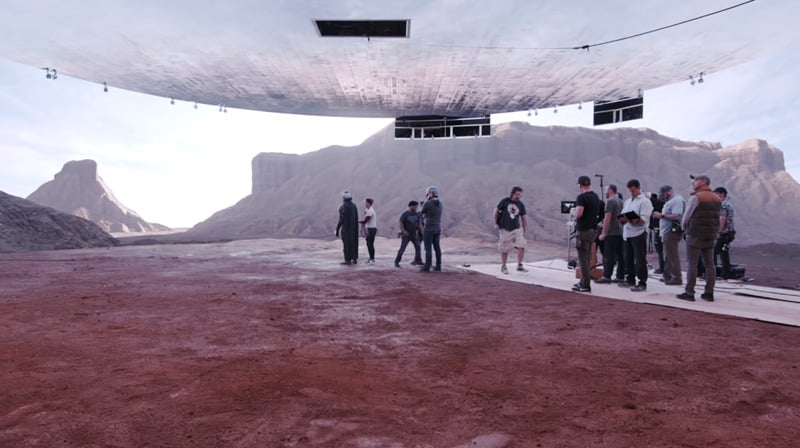
5.2 Virtual Production & XR LED Shoots
With the rise of XR (Extended Reality) and virtual studios, LED volumes are replacing green screens:
Use Genlock to sync the camera with Unreal Engine-powered LED walls.
Fine-pitch LED displays (P1.2 or better) are a must to avoid moiré at close range.
Prefer high dynamic range (HDR) panels for natural-looking lighting.
Test camera-to-wall distance before final takes.
XR professionals often spend hours calibrating camera settings and screen sync before shooting a single frame. Preparation is everything.

6.3 Social Media, Commercials & Ads LED Wall
Content creators shooting with LED walls for Instagram reels, YouTube ads, or digital signage backgrounds often face technical limits with consumer cameras.
How to solve the problem:
Use mirrorless or cinema cameras with adjustable shutter control.
Avoid shooting directly at the wall at wide angles.
When using budget LED screens, blur the wall slightly to mask moiré.
Professionals recommend shooting at higher resolutions (e.g., 4K or 6K) and applying gentle post-processing for best results.
6. Future of LED Walls in Photography & Filmmaking
The use of LED walls in photography and filmmaking is evolving rapidly, especially with the emergence of virtual production environments.
6.1 The Mandalorian Effect
The Disney+ series The Mandalorian popularized LED volumes for cinematic virtual worlds.
Since then, studios globally have been investing in LED stages.
Real-time engines like Unreal Engine allow live compositing on LED walls.
Cameras sync directly with the walls, eliminating post-production greenscreen work.
More information about the Mandalorian LED Wall: http://wp.luotec.com/mandalorian-led-wall
6.2 Next-Gen LED Technologies
Modern LED walls now feature:
Adaptive sync: Automatically aligns with camera shutter in real time.
Ultra-fine pixel pitches (<1.0mm): Virtually eliminate moiré, even at close range.
HDR & wide color gamut: Ensures realistic lighting and accurate exposure in-camera.
6.3 Collaboration Drives Progress
As demand grows, so does the collaboration between:
Camera manufacturers and LED screen developers.
Software platforms for virtual production pipelines.
Content creators seeking real-time environments that eliminate post work.
Thanks to LED walls, the line between physical and digital filmmaking is blurring.
7. Conclusion
LED wall photography opens up endless creative possibilities, but also introduces new technical challenges.
Understanding how LED panels and cameras interact is essential to producing high-quality results.
To avoid flicker and moiré:
Use high-refresh-rate LED screens (≥3840Hz).
Choose fine-pitch panels (P1.2 or better).
Adjust camera settings carefully, especially shutter speed and frame rate.
Sync your camera and LED processor using genlock or control systems when needed.
Hope the above suggestions can help you solve the problems you encounter in LED wall photography !