Perfect Your LED Display: Point-by-Point Calibration Guide!
In the LED display industry, image quality is everything. Point-by-point calibration is here to help!
Whether you are installing an outdoor billboard, an indoor video wall, or a high-end stage backdrop LED screen, your display must deliver vivid, uniform colors and brightness.
However, due to the natural variability of LED components, achieving perfect visual performance is not easy. That’s where point-by-point correction becomes essential.
Table of Contents
1. What Is Point-by-Point Calibration for LED Displays?
Point-by-point calibration is a technology used to improve color accuracy and brightness uniformity across an LED screen.
It works by measuring the brightness and color output of every single pixel—or even each sub-pixel (R, G, B)—on the display. Once the data is collected, correction coefficients are generated and applied through the LED control system.
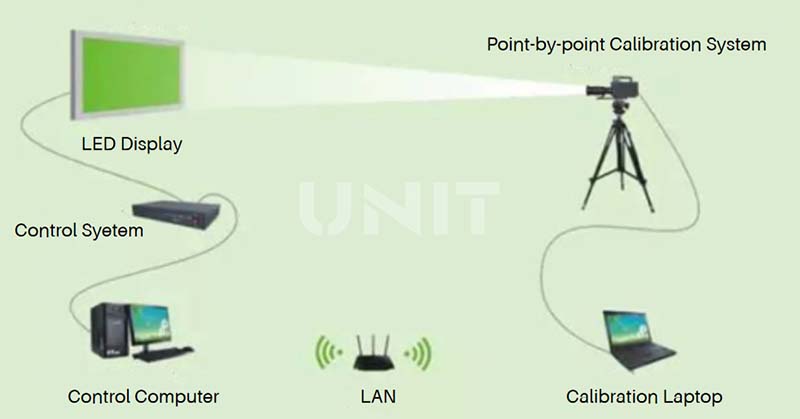
This process compensates for differences between LEDs and ensures that the display shows consistent color and brightness across the entire screen.
Without this calibration, you may encounter noticeable problems such as color patches, uneven brightness, or washed-out images, all of which reduce the quality and impact of your content.
2. Why Is LED Display Calibration Necessary?
No two LEDs are exactly the same. Even when produced in the same batch, LEDs can differ in:
- Brightness and color wavelength
- View angle and light emission axis
- Packaging materials and epoxy purity
- Die size and wire bonding positions

Furthermore, during manufacturing and installation, many other factors affect the final screen performance, such as:
- Inconsistent LED module placement
- Imperfect flatness of the display cabinet
- Uneven heat distribution during operation
- Different rates of light decay over time
All of these factors contribute to visual inconsistencies on the screen. This is commonly referred to as the “flower screen” effect—where some parts appear brighter, dimmer, or color-shifted.
Point-by-point calibration corrects these inconsistencies and restores a smooth, professional image.

Before LED Screen Calibration
3. What to Prepare Before Calibrating an LED Screen
Before you start the calibration process, proper preparation is essential to ensure accurate results. Here’s what you need to do:
(1) Gather Professional Tools
You’ll need precision instruments such as:
– A spectrometer (e.g., Konica Minolta CL-500A)
– A colorimeter
– A laptop with LED screen calibration software installed
– Network/data cables and screwdrivers for module disassembly
These tools allow you to accurately measure and adjust the brightness and color of each pixel.
(2) Clean the Display Surface
Make sure the LED modules are free from dust and stains. Dirt on the mask or LED lamps can distort brightness readings and affect calibration results.
If the mask needs replacement, ensure it matches the original in color and material to avoid visible differences.
(3) Replace Faulty Modules
Any module with dead pixels, abnormal brightness, scan errors, or wiring issues must be replaced. Calibration cannot fix hardware problems.
Only properly functioning modules can be calibrated effectively.
(4) Update Receiving Cards if Needed
If your current receiving card does not support calibration functions or lacks sufficient load capacity, you may need to upgrade the hardware.
(5) Ensure a Controlled Environment
Calibration must be performed in a stable environment without wind, moisture, or external light interference.
For indoor screens, turn off unnecessary lighting and aim for uniform ambient light. A D65 standard light source is recommended for consistency.
![]()
(6) Set Up the Software
Install the software provided by your LED screen manufacturer and familiarize yourself with core features like “color calibration,” “brightness adjustment,” and “point-by-point correction”.
A successful calibration requires both technical tools and software proficiency.
4. Step-by-Step LED Display Point-by-Point Calibration Process
Once preparations are complete, follow these steps to perform effective point-by-point calibration:
Step 1: Adjust Basic Parameters
A. Brightness
Set the display brightness to 1.5–2 times the ambient light.
For example, if the room light is 300 lux, set the screen to around 500–600 cd/m².
B. Contrast
Maintain a ratio between 80%–90% to avoid overexposure or overly dark images.
C. Color Temperature
For broadcasting, use 6500K (cool white). For meeting rooms or showrooms, 5500–6000K (natural white) offers a more comfortable experience.
D. Gamma Setting
Start with a gamma of 2.2. If the image appears too dark or lacks detail, try increasing the gamma to 2.4.
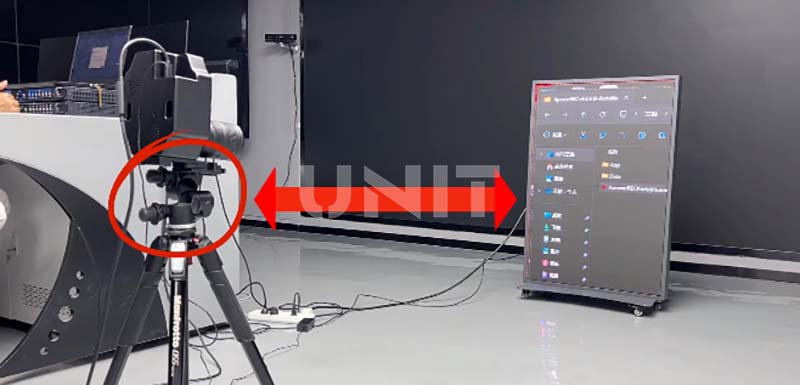
Step 2: Perform Data Collection and Pixel Correction
Activate the “point-by-point calibration” feature in your software.
Using your spectrometer or colorimeter, scan each module to collect brightness values for red, green, and blue.
Mark any areas where brightness deviation exceeds 5%, particularly near the screen edges or seams.
Then, fine-tune the RGB values for outliers.
Adjustments should be made in small increments—no more than 3% per change.
Repeat the process and compare results until the entire screen shows uniform brightness and accurate color reproduction.
Step 3: Fine-Tune Gamma and Color Temperature
Load standard gamma curves such as sRGB, and check for detail visibility in dark and bright areas. Adjust manually if needed.
Measure the actual color temperature and compare it to your target. If, for example, the screen shows 7000K instead of 6500K, slightly reduce the blue channel gain until it reaches the desired value.
5. Important Points to Note
LED point-by-point calibration plays a key role in improving the image quality of display screens.
But in actual operation, it is necessary to pay attention to several aspects to ensure that the calibration effect meets expectations.
The following are several key points that should be noted when performing LED point-by-point calibration:
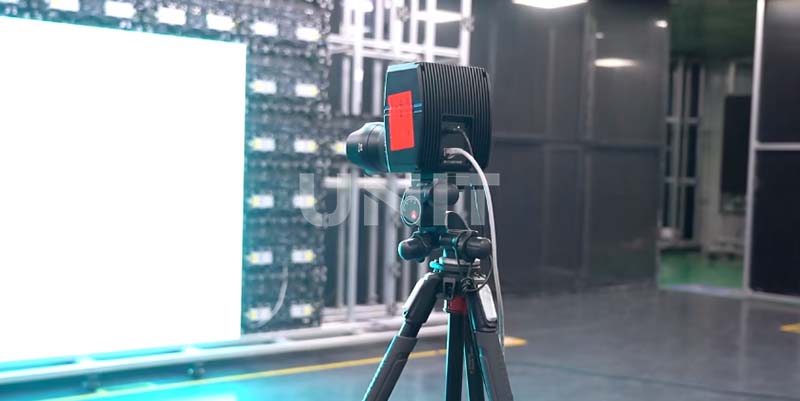
(1) The calibration equipment must be accurate and reliable
Use professional calibration cameras and image processing systems to ensure the accuracy of collected data.
The calibration platform should have high resolution, high dynamic range and color accuracy to truly restore the luminous conditions of LED pixels.
(2) Use the correct calibration algorithm and software
The calibration software must match the current control system and support dual calibration of brightness and color.
The appropriate algorithm (such as edge smoothing, pixel fusion, etc.) should be selected according to the actual screen structure to prevent the “mosaic” effect after calibration.
(3) Save and back up the calibration data
After the calibration is completed, the data should be saved to the receiving card or main control system in time, and the data should be backed up to prevent subsequent misoperation or loss.
Some systems support exporting calibration data files, which can be used for batch module management or quick recovery.
(4) Inspection and verification after calibration
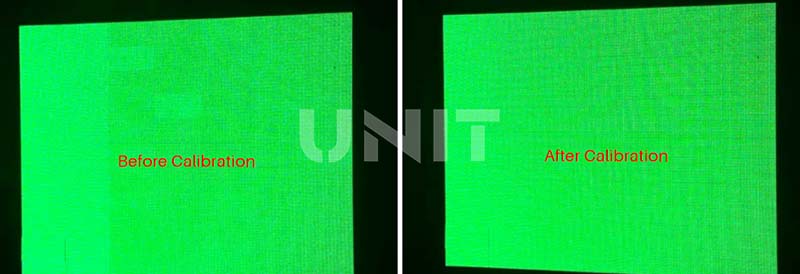
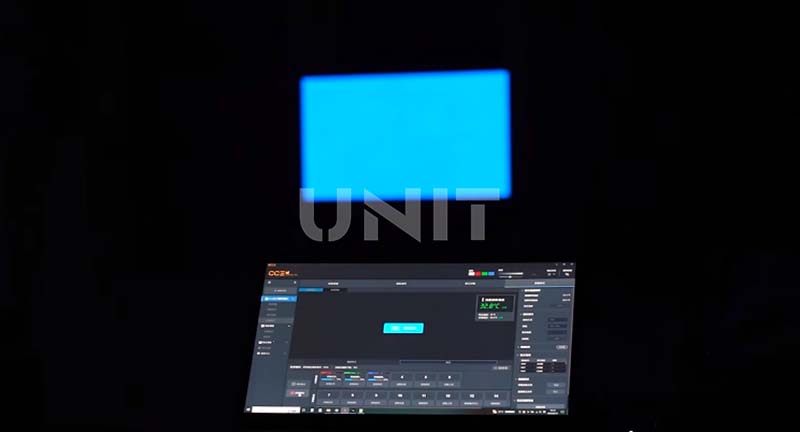
After calibration, the brightness and color temperature consistency test of the entire screen should be carried out to ensure that there are no jumps, color blocks or obvious seams in the picture.
You can play grayscale test pictures, full white pictures and color gradient pictures, compare the before and after effects, and confirm the optimization effect.
6. Comparison of Calibration Technologies
Currently, mainstream point-by-point calibration technologies include on-site point-by-point calibration, single module calibration, and LED cabinet point-by-point calibration, each of which has its own advantages.
(1) On-site Point-by-point Calibration
On-site point-by-point calibration is performed after the LED display is installed.
Its advantage is that it can be adjusted according to factors such as the actual viewing position and ambient light on site.
It can ensure that the display achieves a high degree of uniformity at a specific observation position on site, allowing the audience to obtain the best visual experience.
However, this method also has limitations:
The complex and changing on-site environment may affect the calibration effect
The cost of remote technical support is high, and the calibration process is relatively time-consuming.
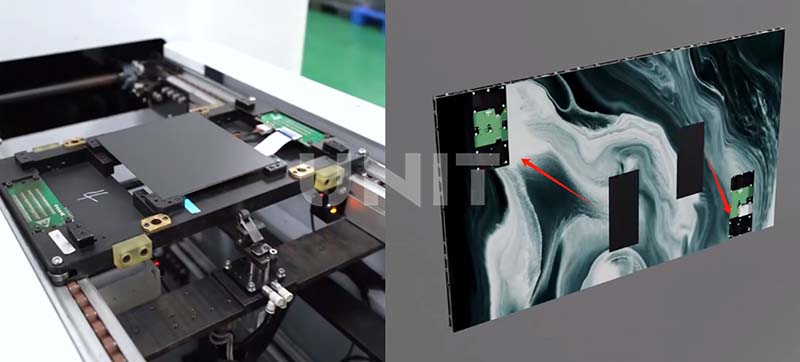
(2) Single Module Calibration
This method uses dedicated calibration equipment to calibrate each LED display module individually.
Once calibrated, the modules can be freely interchanged within the display without causing noticeable color or brightness inconsistencies.
Advantages of Single-Module Calibration:
Significantly improved efficiency
Compared with full-screen calibration, this method can process multiple modules in parallel, greatly reducing the overall calibration time, which is very suitable for mass production and rapid deployment.
After calibration, each module comes with its own correction data.
This allows modules within the display to be freely interchangeable, which is particularly useful for maintenance or field replacement.
When used with an automatic calibration platform, this method supports a standardized, simplified calibration process, making it ideal for factory-level quality control and high-volume output.
Disadvantages of Single Module Calibration
Although each module is calibrated individually, the entire screen is not uniformly adjusted.
Therefore, there may still be subtle inconsistencies in brightness or color after assembly, especially at the edges between modules.
Dependence on dedicated equipment
Single module calibration requires dedicated equipment, such as a module calibration platform and an image processing system.
This results in a high initial cost and may not be practical for small manufacturers or field use.
Because calibration is done prior to installation, any changes in installation conditions (such as power changes, viewing angles, or environmental factors) cannot be dynamically corrected, limiting flexibility compared to full-screen calibration.
(3) LED Cabinet Point-by-point Calibration
The LED cabinet point-by-point calibration is to calibrate each cabinet on the production line.
It can ensure that each cabinet achieves a high degree of uniformity when it leaves the factory.
It is relatively efficient, not subject to excessive restrictions on time and site, and has a low cost.
However, it cannot fully take into account the actual on-site conditions after the display is installed.
The following table compares the three technologies more intuitively:
|
Correction Technology |
Advantages |
Disadvantages |
|
On-site Point-by-point Correction |
Can be adjusted according to the on-site viewing position and environment to ensure high uniformity at a specific observation position |
The on-site environment has a great impact, the cost of remote technical support is high, and the correction is time-consuming |
|
Single Module Calibration |
Significantly improved efficiency Interchangeable modules Suitable for mass production |
Limited calibration accuracy Dependence on dedicated equipmen Lack of real-time adjustment |
|
LED Cabinet Point-by-point Correction |
The cabinet has high uniformity when leaving the factory, high efficiency, low cost, and is not subject to too many restrictions on time and venue |
Cannot fully adapt to the actual situation on site after installation |
By comparing the two technologies, we can choose a more appropriate calibration method based on the specific usage scenarios and requirements of the LED display.
7. FAQs About LED Display Calibration
(1) Can all LED screens be calibrated?
Yes. Any LED display—new or used—can be calibrated.
Most manufacturers don’t perform calibration before delivery, and over time, LEDs decay at different rates.
If you notice poor color reproduction, calibration is highly recommended.
.elementskit-card END
(2) Do I need a special driver IC for point-by-point calibration?
No. Calibration relies on the LED control system. As long as your system supports this function, no special driver chip is required.
.elementskit-card END
(3) How long does calibration take?
For example, calibrating a 100-square-meter outdoor LED screen typically takes 4–6 hours, depending on the screen type and environmental conditions.
.elementskit-card END
(4) If I already use color-sorted LEDs with ±1nm wavelength, is calibration still needed?
Yes. While precision sorting helps, it doesn’t solve all problems.
Brightness variation is still ±10% or more, and aging during production causes inconsistent light decay. Calibration is the only way to ensure final display uniformity.
.elementskit-card END
(5) Can calibration replace LED sorting and quality control?
No. Calibration can only compensate for minor inconsistencies.
If the screen uses a mix of round and oval LEDs or poorly sorted LEDs, calibration can’t correct physical differences like light angle or emission profile.
High-quality LEDs and strict manufacturing standards are still essential.
.elementskit-card END
(6) What if I change the control system, modules, or cabinets?
No worries. Professional LED manufacturers maintain a database of calibration profiles.
Your calibration data can be backed up and restored after hardware replacement to ensure continuity in display quality.
.elementskit-card END
8. Conclusion
Point-by-point calibration may seem like a technical task, but it plays a critical role in delivering professional-grade image performance. From enhancing color consistency to extending screen lifespan, it ensures that your LED display looks as good as it was designed to be.
Whether you’re a system integrator, rental business, or end user, never underestimate the importance of calibration. A small investment in time and equipment brings massive visual benefits and makes your LED screen stand out in the competitive market.
Want to calibrate your LED display for optimal performance? Contact us! UNIT LED provides you with high-quality LED display solutions with professional point-by-point calibration support!